
How to Build A Sandcastle
- The basics
The list of ingredients for creating a simple sandcastle is misleadingly short: sand, water and a few digging and carving tools.
-
- Sand
- The first and most important thing you need to know about sand is that you can't do a thing with it unless it's wet. Here's why: when you add water to grains of sand, the liquid forms "bridges" that connect the granules to one another. This is why damp sand sticks together, so you can shape and carve it.
- Packing down or "tamping" wet sand drains more water more quickly, creating even shorter bridges and an even more solid clump. Sand that has been compacted in this way can be subjected to extreme carving.
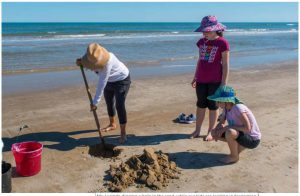
- Dig a water hole
- If you're building at the beach, the best way to obtain an unlimited supply of H2O is by digging a self-replenishing water hole. Start digging.
- Keep digging until you hit water. Don't worry about how wide the hole is – you're aiming for depth, not width. The hole will get wider as you pull wet sand from its depths. Keep in mind that you're digging a well here, not a moat. When the water starts puddling at the bottom of your hole, you can stop digging.
- The fail-safe recipe for castle concrete is one part sand to one part water. Pour the water in the big bucket first, then shovel in the dry sand for easier blending. Mix thoroughly and you're ready to scoop.
- Pile the sand you excavate for your water hole into a mound about 1ft from the edge of the hole. Pack your mound of sand into a round, level base that is 2-3ft in diameter. This will serve as the foundation for your castle, giving you some added height and providing drainage for all the water you're going to use in construction.
- Packing down or "tamping" wet sand drains more water more quickly, creating even shorter bridges and an even more solid clump. Sand that has been compacted in this way can be subjected to extreme carving.
- Water
- Use lots of water. Dry sand in its natural state is lazy stuff. It wants to lie down and spread out into all sorts of nooks and crannies. The good news is that as long as you keep gravity working for you, there is really no way to add too much water. Which brings us to our second rule.
- Let it drain. If you've ever tried to make the base of a sandcastle by filling a plastic bucket with wet sand and then trying to unmould it, you've seen how important this rule is. With no place for the excess water to drain off, the sand makes a sucking, sticking, vacuum seal with the plastic and it becomes difficult, if not impossible, to remove the bucket. Shown here is a bucket with the bottom cut out. By filling and sliding up, and filling again, it is possible to keep raising the level.
- This is why successful sand sculptors do not use plastic buckets or other closed moulds but build their shapes by stacking handfuls of wet sand or by tamping it down in a topless and bottomless form.
- Compact the wet sand to form structures. "Pounding sand into submission" is an intuitive and time-honoured method of strengthening and tightening those bridges that hold the grains together. You can use your hands or feet, or even a tamp, to compact wet sand.
- Sand
- The Equipment
You can, of course, dig, shape, smooth and even carry water with nothing but your own two hands. But having the right equipment will make your sandcastling experience infinitely more pleasurable. Here are the essentials:
-
- A long-handled, lightweight shovel
- If your goal is to achieve any kind of altitude – and it is! – you're going to do some serious digging. If you have the opportunity to bring or buy one object, make it a shovel, ideally a long-handled model with a small scoop. The sand-sculpture task that feels the most like work is digging the hole and mounding up the sand. A little garden spade is better than nothing.
- A bucket or two
- If you can't dig down to water you'll need at least two buckets: one to mix the sand and water in and one to carry water.
- Carving tools
- You could probably find most of these buried in kitchen drawers and toolboxes. Smoothing and shaping tools: at a minimum, find yourself an old kitchen (or plastic) knife with the tip broken off. For basic shaping, almost anything with a thin blade and straight edge will work such as putty knives, paint scrapers and trowels. The best all-round shaping tool for your kit is something with an offset handle. A pastry knife with a squared-off end (they usually come rounded) is ideal. Finishing tools: at a minimum, find yourself a soft-bristled paintbrush and a plastic drinking straw. The brush will come in handy for smoothing surfaces and the straw works well for blowing loose sand out of detailed carving. In an emergency, you can make a pretty good set of tools out of plastic eating utensils.
- A long-handled, lightweight shovel
- The building methods
- Soft-packing
- Soft-packing is how the majority of the uninitiated approach sand.
- Step 1 Mound up a big pile of sand.
- Step 2 Stabilise the pile. Using the long handle of your shovel, poke a lot of deep holes into the pile then pour buckets of water into the holes. Stomp on the pile until it feels very solid beneath you. If necessary, go back and poke more holes and add more water.
- Step 3 Pack and shape. Working from the tallest element in your composition, pack the shape with your hands until it feels stable. Take handfuls of moist sand, push them into place and roughly shape them.
- Step 4 Carve and smooth. Using your smoothing tool, smooth and define the elements of your composition.
- Step 5 Moisten as necessary. The longer you work on your composition, the more your sand sculpture will dry out – you must keep it moist.
- Step 6 Keep pushing and smoothing.
- Step 7 Work your way down the pile.
- Hand-stacking
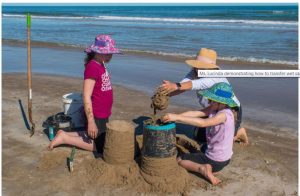
- When you're tired of crawling around a soft-packed sculpture on your hands and knees, you will be ready to try hand-stacking. It takes practice but once you master the mix-scoop-plop-flatten-jiggle move, you'll be building the best castles on the beach. The method is just a modified dribble technique using larger handfuls of sand – very large, very wet handfuls.
- Hand-stacking involves scooping out handfuls of wet sand and helping them settle into each other in order to form structures. It's the only building technique in which you mix the sand and water in advance. With soft-packing, you start moulding with dry sand and then add water.
- The most difficult aspect of hand-stacking is that it's less intuitive than soft-packing; many people have an instinctual urge to pound the sand into submission. Hand-stacking is a great way to involve the whole family in a sand-sculpture project, with duties evenly divided between "stackers" and "carvers".
- Step 1 Mix. Use your hands – and even your feet – to mix up the compacted sand at the bottom of the hole. Properly mixed sand has the consistency of cake batter. It is very important to keep the wet sand moving as you build. Sand is heavier than water and, left alone for more than a few minutes, will sink to the bottom of the hole. So repeat the mixing step every time you start another structure.
- Step 2 Scoop. You will soon find that big, fat things are easier to carve then little, skinny things, so build big. To do this, you need big handfuls of sand. You do not need big hands to get big handfuls if you scoop properly.
- Step 3 Plop. With one smooth, swift motion (so that you don't lose too much water), plop the double handful of sand on to your base. There may be a bit of "pouring", but a common error to avoid is the "slam dunk". The taller and more delicate your structure is, the more gently you should plop. If you are building a tower, keep your hands on top of the sand; if you are building a wall, your hands will go directly to the sides.
- Step 4 Jiggle. Very gently, jiggle the new pile of sand. Your goal is to get a thin, flat layer of very wet sand to melt into the layer beneath it. The common urge is to force this to happen by pounding, packing and pummelling the sand into compliance. Resist. Instead of using brute force, jiggle or vibrate the sand, helping it to settle evenly on to the layer beneath. Wet sand wants to flow downwards, and as long as you keep it moving, it will continue to settle in on itself, becoming denser and filling in spaces.
- Almost as important as understanding how to jiggle is knowing when to stop. When the sand has stopped flowing, further jiggling will form cracks in your structure. Don't jiggle sand that has already settled into place.
- Soft-packing
- The building blocks
There are three basic building units in a hand-stacked castle: the tower, the wall and the arch. Once you have mastered all three, you will be able to combine them into an endless variety of shapes and permutations.
-
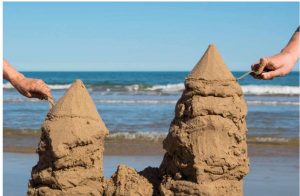
- Towers
- Once you have discovered the joy of attaining altitude, there will be no looking back. A tower is just a big stack of sand pancakes; your only limit is your reach. Remember, the more water you keep in the sand, the longer your tower will last. Remember also that a larger (in diameter) base will help you build higher, carve more easily and leave you with more options.
- Step 1 Position yourself at the edge of your water hole, close to the pile of sand that will serve as your foundation. This foundation should already be well packed and have a flat surface.
- Step 2 Mix the sand and water in the bottom of the hole until the sand flows.
- Step 3 Scoop up a big double handful of sand, keeping your hands together and pointed towards your stomach.
- Step 4 Plop/pour the sand on to the foundation, immediately flattening it with your palms by applying firm pressure. Keep working the sand with a steady jiggling action. Aim for a patty 20-30cms in diameter. Note: speed is key here. If you hesitate, the water will run through and the sand will be frozen in place.
- Step 5 While the sand is still moving, put your hands on the edges of the sand pancake and continue vibrating the sand. Once the water has run through and the sand is no longer moving, stop. Don't pound on your sand pancakes; let water and gravity do the compacting. Only jiggle freshly placed wet sand. Once the water has run through, the pancake becomes fixed in place. If you jiggle it you will break the bonds that are holding it together.
- Repeat Continue scooping out fresh handfuls of sand and flattening them into pancakes. You will apply less downward pressure and spend more time jiggling the edges with each successive layer. Also, as you attain altitude, you will want to make each pancake slightly smaller than the one under it, so that the new pancake doesn't slop over the sides of the one being plopped upon.
- As your tower gets higher, resist the temptation to "work" the sand too much. Feel free to flatten the first three or four pancakes that form the base of your tower; you want them to spread. But when your tower is about five layers tall, start easing up on the pressure. By the time your tower is 1ft high, you should be applying almost no downward pressure at all – gently cup the sides of these top pancakes between your palms and jiggle just enough to help settle them on to the stack. The top layers don't need to be jiggled at all, just plopped – gently.
- When the tower starts looking precarious, it's a good sign it's time to stop, mix up the sand in your hole and then start another tower right next to the first one. Then build another, and another, and then one more, and by this time you should have a good feel for tower-building. Now you're ready to break out the carving tools.
- Walls
- Walls are an important architectural element you can use to connect towers, create a staircase, or encircle a castle. You can cut tunnels into walls, or you can carve your name on one.
- The basic wall-building technique differs only a little bit from tower-building. Instead of flattening the wet sand into pancakes, form it into bricks. After mixing, scooping and plopping down a very large handful of wet sand, reposition your hands to the sides of the blob and jiggle until the wet sand fills the space between your hands. For the best results, keep your hands flat, palms inwards and parallel to one another, 7-12cms apart. Keep up the vibrating motion until the top settles into a smooth, flat surface. Your first walls will be small, as they will connect the towers you have already built.
- Step 1 Mix the sand at the bottom of the hole.
- Step 2 Pull a double handful of wet sand from the hole.
- Step 3 Plop the sand into the space between two of your towers. Let it fall as far down as it will go, then quickly position your hands on either side and jiggle the sand to help it settle in even deeper. (Don't jiggle the towers!)
- After you have created one brick, try placing another on top of it. Repeat this process until all of your towers are connected by walls.
- Arches
- The ancient Romans knew the secret to building arches – use a keystone, the single block of stone at the apex of the arch which holds the entire structure together. Arches look hard, but you'd be surprised at how simple they are to make. You might want to experiment first with tunnelling through a wall. Then give arch-building a try.
- Step 1 Start building two tower bases fairly close (7-12cms) to each other.
- Step 2 When you reach the height where you want the arch to begin, scoop a handful of wet sand, and …
- Step 3 … positioning your other hand as a support next to one tower, plop your handful and jiggle so that it slops over the edge in the direction of the other tower.
- Step 4 Do the same thing on the other tower.
- Step 5 Continue working back and forth between the two towers, bringing the ends closer together. Don't try to build straight across; you have to build upwards, partially supporting each layer on the layer below.
- Step 6 When the ends are very close, join them with the keystone – one final plop of wet sand that holds the arch together.
- Step 7 Add layers of sand pancakes to the top of the arch until you reach the desired thickness. Keep the supporting hand underneath. Don't try to pack or force the sand into place; just jiggle the liquid sand to where you want it.
- A few tips for a great arch:
- Beginners should keep towers close together at first. Once you have mastered the technique you will be able to span larger areas.
- Don't try to pack or compress sand – let it flow.
- When you succeed in building a sturdy arch, try building a small tower at the top of the arch.
- To build a really big arch you'll need more support underneath in the form of a spare set of hands or some kind of structure, such as the side of a bucket covered with dry sand (for drainage).
- Towers
- Combining structures
-
- Now it's time to put it all together. One tower by itself does not a castle make. Build multiple towers on your base, then join them together with walls, staircases and bridges.
- After you have built one tower, build another joined to the first with a gracefully arched bridge.
- Step 1 Pack a level base for the second tower close to that of the first. It helps if your first tower has a balcony or ledge to anchor your bridge.
- Step 2 Stack your second tower to the height of the first tower's balcony.
- Step 3 Using your hand for support, plop a very large handful of wet sand between the two towers.
- Step 4 Jiggle to help the sand settle.
- Step 5 Hold in place until the water has run through, then (gently) pull the supporting hand free.
- Step 6 Continue building your second tower, being very careful not to apply too much pressure on the top.
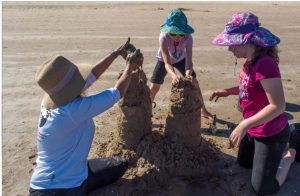
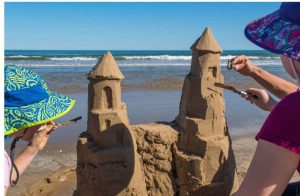
- Carving
- Now that you've built some walls and towers it's time to pretty them up. Here are some basic rules:
- Always work from the highest point down. Otherwise loose sand will mess up already carved surfaces.
- As you carve, little mounds of dry sand will pile up in low-lying areas; you need to keep brushing that it away to get to the firmer, wet-packed sand.
- Whenever possible, hold your knife at the same angle at which you are cutting, so that it smooths and shaves the surface.
- Try not to saw or hack away at the sand; use long, smooth strokes.
- Carve conservatively. Once sand has been carved away there is no easy way to put it back.
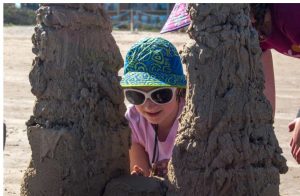
- Masterpiece
- Here is a simple castle with towers, a wall, an arch and some fun details.
- Don’t forget, every caste no only has windows and doors, but stairs as well. Stairs are a simple design element that makes the sculpture pop.
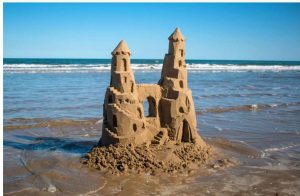
- In the end, you get to stand back and enjoy, take a few photos, and high tide will take care of the rest.
-

3782 Carlsbad Blvd- Luxury Vacation Home at the Beach in North County San Diego
